|
THE AIRCRAFT
Stemming from a 1936 company study, the D-520 obtained its
name from the French Air Force's speed requirement (520 km/h) for the design.
The design was initially rejected in favor of the MS 406, but Dewotine continued
with its design and built two prototypes at company expense. The French
government finally rewarded Dewotine's persistence with several successive
contracts but only three prototypes had been flown by the time war broke out in
September 1939; although, orders were on hand for 2,200 aircraft. When the
German attack in the West finally opened in May 1940, the French Air Force only
had 36 operationally cleared D-520's. In June French pilots were picking
their aircraft up directly from the factory in one's and two's, and
by the time France fell 437 D-520's had been delivered. A remarkable
record considering that real production didn't begin till Germany had set foot
on French soil. In combat the D-520 was able to hold its own against
contemporary German and Italian aircraft with performance roughly comparable to
the British Hurricane, reasonable armament (one 20mm hub mounted cannon with
four wing mounted 7.5 mm machine guns) and, incidentally, considerably better
looks than other French fighters of the time. During the Battle of France
it maintained an almost two to one kill ratio (147 kills to 85 losses), and was
the best French fighter of its time. Following the fall of
France, the Vichy government continued to produce and fly the D 520. The
aircraft subsequently saw action against the Allies in the North African
campaign and later on was used by the Luftwaffe, mainly as a fighter trainer,
but also operationally on the Eastern Front. It was also issued by the
Germans to Italian, Bulgarian, and Romanian units. Eventually coming full
circle the aircraft was again flown in France by Free French pilots following
the Normandy invasion and continued on post war, with its last
flight for the French Air Force being on 3 September 1953. The aircraft as
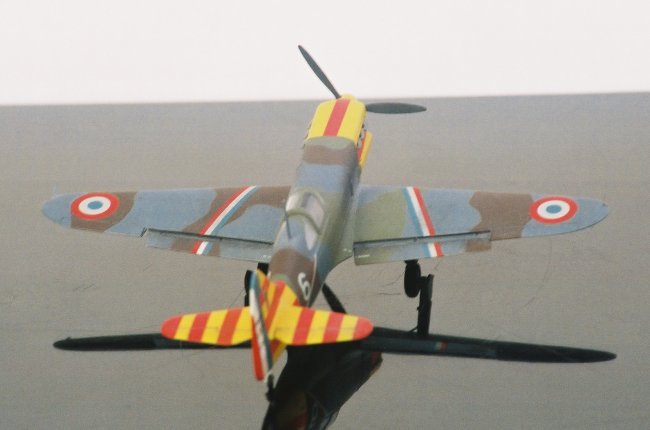
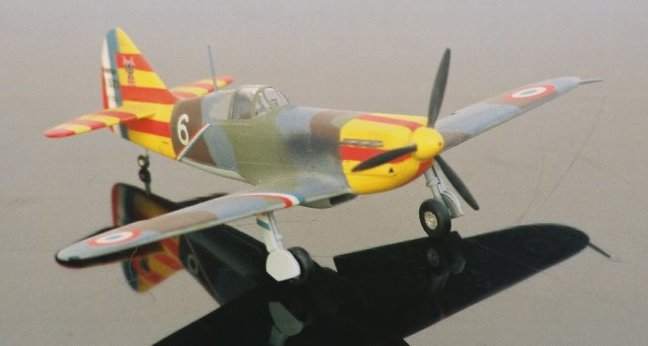
modeled represents one from the 6 Escadrille, Groupe de Chasse III/6 based at
Ryak, Syria during the Allied 1941 invasion, and carrying colorful Vichy red and
yellow stripes.
|
Click on
images below to see larger images
|
|

|

|
THE MODEL
This kit was one of the WW II releases that Hasegawa issued during
the '90's, and the particular kit I used was the one that contained Vichy
markings. The measurements of the model work out to dead on for scale
accuracy, and the kit has engraved lines and a nice, thin canopy. The kit
cockpit is somewhat plain, so I replaced it with the High Tech's resin set for
the D520. This set is well detailed and fits like a glove. It
includes
a one piece cockpit floor and rear bulkhead, instrument panel, various boxes for
the cockpit sidewalls, undersurface radiator scoop, and replacement control
surfaces. The only negative feature of this detail set is the seat back;
there is none, so it has to be made from scratch. On the real aircraft
this was a tubular frame, covered by canvas, set on a bucket seat, and the Hi
Tech instructions include a scale drawing of both. To simulate this I used
a paper clip, cut to size and bent to shape. I then covered this with
tissue paper soaked in water and white glue. Once that was dry the seat
back was fixed to the seat bucket using CA glue. At the same time the cockpit
walls were detailed with stringers from Evergreen strips and the resin detail
pieces. I painted the cockpit a medium gray, in accordance with the
kit instructions, and the canvas seat back khaki drab. I now believe the
cockpit color is wrong. Lynn Ritger has subsequently posted a beautiful
cockpit shot of the D 520 (where does he get these pictures, and where was he
when I needed him?) and it shows the cockpit to be a dark blue with the
instrument panel in black. Oh well, live and learn. The fuselage was
assembled with no problems, and the rear quarter panel windows installed, once
the area behind them was painted. These were initially glued in with white
glue, to seal them off. Once that was dry CA glue was applied. The
white glue prevented the CA fumes from getting inside these windows and fogging
them. These were then sanded and polished back to clarity using
successively finer grades of Flexi Grit and polishing with Brasso. Before
the wings were assembled the flaps were cut out, to be
replaced by resin ones that came with the Hi Tech set. I left the flaps
off till the kit was painted and clear coated, then they were glued on with CA
glue. Once the wings were on the canopy was glued on then faired in with
putty, rescribing was done, the landing gear legs were added, and I was ready
for painting.
PAINTING, DECALING, AND
FINISHING
The primary paints of choice were French Air Force
colors from the now defunct Aeromaster range of enamels. The nose and tail
were masked off and sprayed Model Master flat white, then Gunze Sangyo Yellow
(H-4), except for the rudder which was left white for reasons I'll explain
later. Once these were masked off with cellophane tape the topside was
painted. Dark Blue Gray (9101) was sprayed first, followed by Khaki
(9102), then Brown (9103). The bottom was then done in Light Blue Gray (9101).
As always paper masks were used for these. Tamiya clear gloss was sprayed
on to prep for the decals, then the replacement flaps were glued on. The
decals are a mix of
kit decals and Carpena sheet 72.40. The red "Vichy" stripes are
kit decals, and despite what many have said about Hasegawa decals, I've never
had any problems getting them (or Tamiya for that matter) to conform to panel
lines using Micro Sol. The one thing to be careful of with these stripes
is making sure they match up on both sides of the aircraft. I would apply
one side's stripes first, let them dry, then apply the other side making sure
the leading and trailing edges of the decals matched up. The other kit
decals I used were the wing, rudder, and fuselage stripes; although, I wasn't
that happy with them. The white part of these stripes are the
infamous Hasegawa "white," but I didn't feel like hand painting these
on the wings and fuselage. To get around this problem on the rudder decal,
I cut out the white section and applied the blue and red sections over the white
painted rudder. A company called Model Art has subsequently released
a sheet with these stripes, which takes care of this problem for the fuselage
and wings. The rest of the decals all came from the Carpena sheet.
I've never figured Carpena decals out. They are thin, but I've always had
trouble getting them to conform to panel lines even using large amounts of Micro
Sol; although, I recently read somebody has had success with Solva Set, so I'll
have to give that a try. Once these had dried the model was wiped down to
remove excess setting solution, then sprayed with clear gloss again.
Weathering was applied at this point using artist's oil paints
(Payne's Gray and Titanium White) along the control surface hinges. Following
that appropriately doctored Testors Dullcote was applied for the matte coat.
All that was left was gluing on the landing gear doors and wheels, and spraying
exhaust stains (RLM-66 mixed with flat brown), and the kit was finished.
Like all of Hasegawa's 1/72nd WW II fighters the D-520 is an easy build, and the
Vichy markings make for an attractive scheme.
Murph
|
Click on
images below to see larger images
|
|

|

|
|
|